


研究这个问题之前我们需要讨论下 Spring Boot 项目的打包方式。
Spring Boot 打包的方式
Spring Boot 默认的打包方式为 fat jar,即项目的依赖 jar 包也会被包含在 Spring Boot 项目的 jar 包当中。Spring Boot 项目的 jar 包结构如图所示:
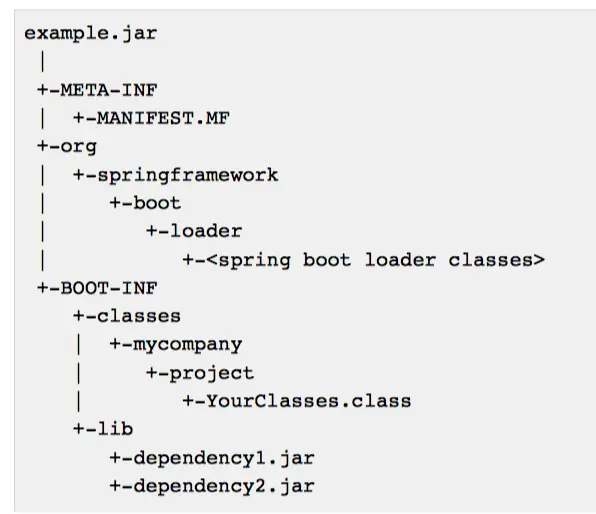
如图所示,所有依赖 jar 包位于 BOOT-INF/lib 目录下。
Spring Boot 默认 fat jar 的打包方式好处是比较多的。项目最终生成仅仅是一个文件,基本上不依赖运行环境,极大地方便了部署和上线操作。
可是这种方便的 fat jar 方式并不适用于各种场景。比方说我们需要将依赖的 jar 包独立出来,不放入最终项目的 jar 文件内,该怎么操作呢?
Spring Boot 依赖分离打包
这种打包方式也有专门的英语名词:thin jar。下面介绍两种 thin jar 的打包方式。
IDE 直接分开打包
下面以 Intellij IDEA 为例,讲一下如何以 thin jar 方式打包。
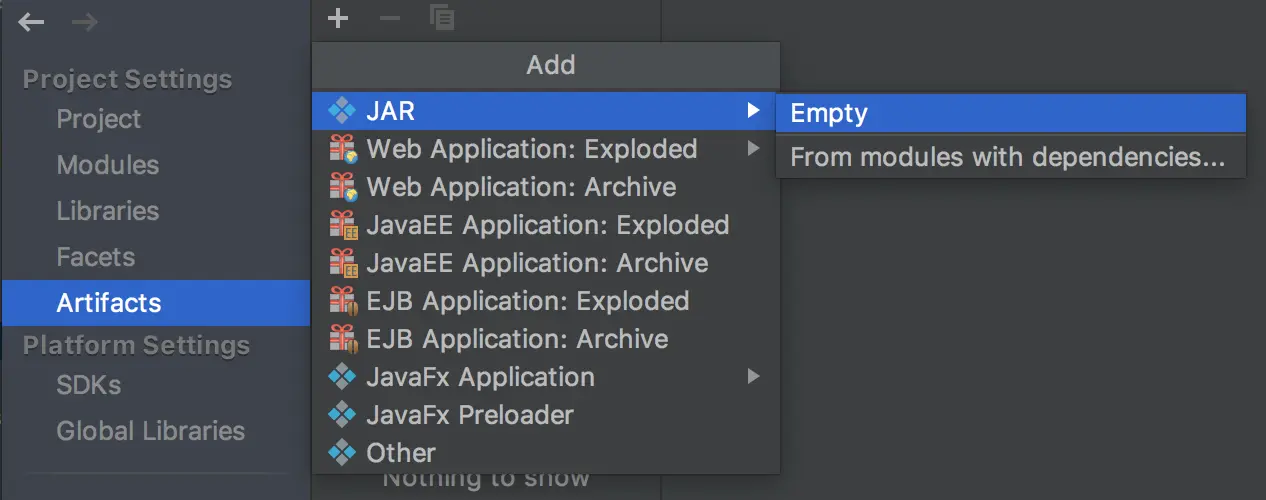
打开 Project Structure -> Artifacts,点击 + -> JAR -> Empty
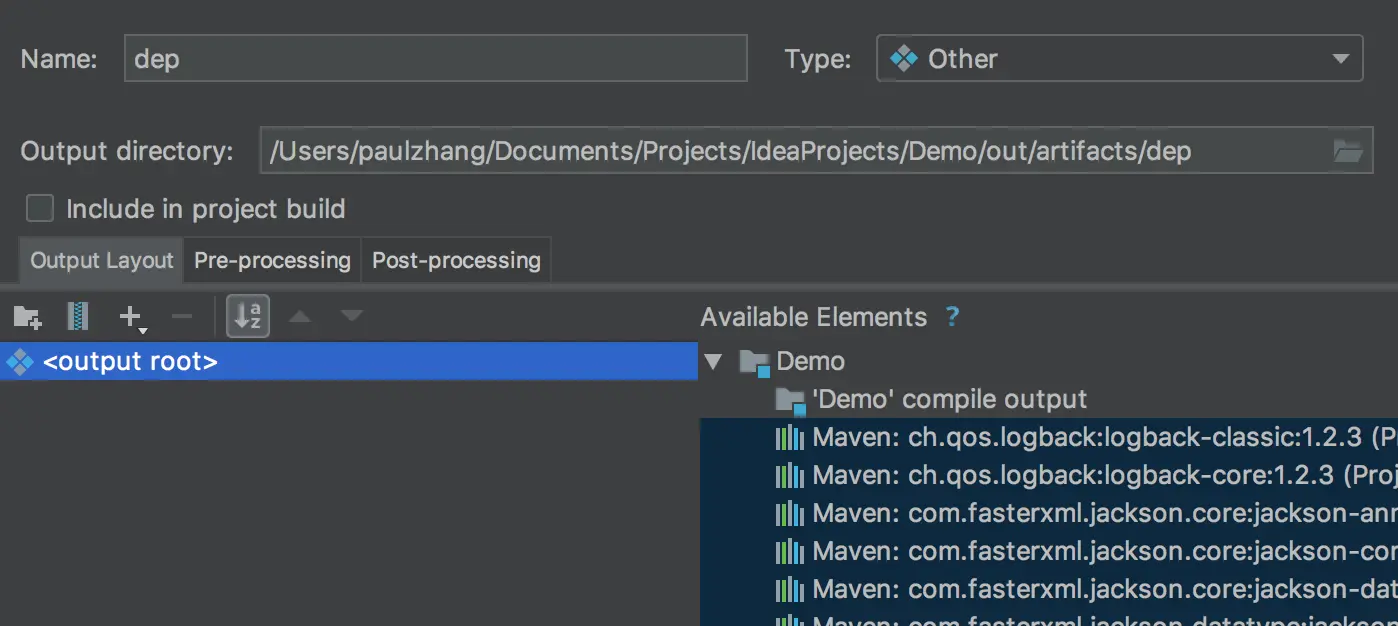
name 起名为 dep,type 选择 Other。在右下方选择所有的 Maven 依赖包,右键选择 Put into Output Root。
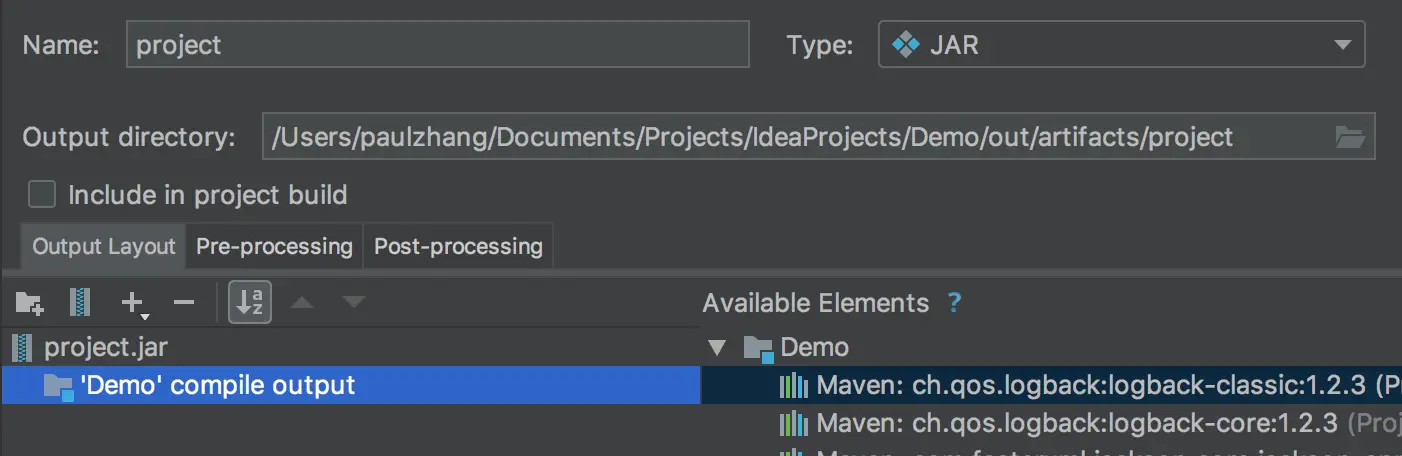
同上,再次创建一个 artifact,选择 jar -> Empty,name 设置为 project,type 为 jar。右下方 Available Elements 右键点击 'Demo' compile output,选择 Put into Output Root。
配置完打包方式之后我们可以进行打包操作了。方法为点击 Build 菜单 -> Build Projects。Build 刚刚创建的两个artifact。最终成品位于项目的 out 目录。
接下来问题来了,我们自定义的打包方式破坏了 Spring Boot fat jar 固有的结构无法直接运行了。为了解决这个问题,我们需要使用 java -cp 命令运行项目,手工指定 classpath 和 main 函数入口。
完整的 shell 脚本如下:
#!/binbash
#run.sh

# 项目的 jar 文件名称
libPath=package.jar
# 依赖包的位置
for jar in lib/*.jar
do
  libPath=${libPath}:${jar}
done

echo ${libPath}
# main 函数的全名
java -cp ${libPath} com.paultech.MainClass
使用 Spring Boot Thin Launcher
为了避免使用繁琐的 shell 脚本运行项目,我们可以使用 Spring Boot Thin Launcher 来打包 Spring Boot 项目。该工具的 GitHub 地址为:https://github.com/dsyer/spring-boot-thin-launcher
<build>
    <finalName>erbantou-cloud</finalName>
    <plugins>
        <plugin>
            <groupId>org.springframework.boot</groupId>
            <artifactId>spring-boot-maven-plugin</artifactId>
            <!--这里写上main方法所在类的路径-->
            <configuration>
                <mainClass>com.erbantou.ErbantouApplication</mainClass>
            </configuration>
            <!-- 引入 thin 依赖,瘦身包打包的核心配置 -->
            <dependencies>
                <dependency>
                    <groupId>org.springframework.boot.experimental</groupId>
                    <artifactId>spring-boot-thin-layout</artifactId>
                    <version>1.0.28.RELEASE</version>
                </dependency>
            </dependencies>
        </plugin>
        <!-- 解压指定包到指定目录,这里用于重写第三方包实现方法,打入包内,优先供 jvm 加载,非必须 -->
        <plugin>
            <groupId>org.apache.maven.plugins</groupId>
            <artifactId>maven-dependency-plugin</artifactId>
            <executions>
                <execution>
                    <id>unpack</id>
                    <phase>prepare-package</phase>
                    <goals>
                        <goal>unpack</goal>
                    </goals>
                    <configuration>
                        <artifactItems>
                            <artifactItem>
                                <groupId>com.erbantou.custom</groupId>
                                <artifactId>custom-override</artifactId>
                                <version>${custom-override.version}</version>
                                <type>jar</type>
                                <!-- 将 custom-override.jar 解压到 classes 目录下,用于重新打包 -->
                                <outputDirectory>${project.build.directory}/classes</outputDirectory>
                                <!-- 忽略 custom-override.jar 的 META-INF/MANIFEST.MF 文件 -->
                                <excludes>META-INF/MANIFEST.MF</excludes>
                            </artifactItem>
                        </artifactItems>
                    </configuration>
                </execution>
            </executions>
        </plugin>
        <plugin>
            <groupId>org.springframework.boot.experimental</groupId>
            <artifactId>spring-boot-thin-maven-plugin</artifactId>
            <version>1.0.28.RELEASE</version>
            <executions>
                <!-- 在编译时下载依赖包到输出包同级目录,非必须,这里我们不用 -->
                <!--
                <execution>
                    <id>resolve</id>
                    <goals>
                        <goal>resolve</goal>
                    </goals>
                    <inherited>false</inherited>
                </execution>
                -->
                <!-- 生成 thin.properties 文件,用于维护依赖关系信息
                     项目有多层依赖,如果没有配置,则会导致父层依赖关系缺失 -->
                <execution>
                    <id>properties</id>
                    <goals>
                        <goal>properties</goal>
                    </goals>
                </execution>
            </executions>
        </plugin>
    </plugins>
</build>
整理好的依赖包所在的目录为 target/thin/root/repository
我们仍然可以使用 java -jar 命令启动项目。
如果启动时需要指定依赖包的目录,可以使用如下命令:
java -Dthin.root=path/to/lib -jar spring-boot-app.jar
将 path/to/lib 替换为依赖包所在的目录。如果依赖包不完整,需在 path/to/lib 或 ~/ 目录下存在 .m2/settings.xml 的 maven 仓库配置信息和 repository 目录,否则瘦身包将无法自动下载依赖包并运行。且默认 repository 需存在 org/springframework/boot/experimental/spring-boot-thin-laucher/1.0.28.RELEASE/spring-boot-thin-launcher-1.0.28.RELEASE-exec.jar,版本与打包插件的版本需一致。
repository/
└── org
    └── springframework
        └── boot
            └── experimental
                └── spring-boot-thin-launcher
                    └── 1.0.28.RELEASE
                        └── spring-boot-thin-launcher-1.0.28.RELEASE-exec.jar
瘦身包运行方式(补充)
nohup 方式运行
# 以 erbantou-cloud.jar 为例
# 第一次运行后会在 repository 目录存放从 maven 拉取到的相关依赖包
# 如果想要看到更多输出信息,可以加参数 `-Dthin.debug=true` 和 `-Dthin.trace=true`
# 如果不想重启自动更新最新版依赖,可添加参数 `-Dthin.offline=true`
# PS:这里使用绝对路径,实际操作中,可以进到目录再使用相对路径,避免单行命令太长
# java 命令可按需添加其他 jvm 参数等
nohup java -Dthin.root=/home/ivan/apps -Dspring.config.additional-location=/home/ivan/apps/config/erbantou/bootstrap.yml -jar /home/ivan/apps/erbantou-cloud.jar > erbantou-cloud.log 2>&1 &
# 使用 offline 模式更新依赖,或者从 gitlab 仓库拉取依赖包更新(gitlab 只提供独有包)
java -Dthin.dryrun=true -Dthin.root=/home/ivan/apps -jar /home/ivan/apps/erbantou-cloud.jar
# 服务器网络无法直连方舟 maven 仓库,可通过有网络的环境拉取到 repository 依赖后替换
服务方式运行
# 示例服务配置文件
[Unit]
Description=Tomcat For erbantou
After=syslog.target network.target remote-fs.target nss-lookup.target

[Service]
# 服务用户,如果有设置,需确保 jar 包用户和组信息与配置一致
User=ivan
# 服务用户组,如果有设置,需确保 jar 包用户和组信息与配置一致
Group=ivan
# 工作目录,如果有配置,则命令里可以使用工作目录对应的相对路径
WorkingDirectory=/home/ivan/apps/
# 服务启动命令
ExecStart=/usr/bin/java -Dthin.root=. -Dspring.config.additional-location=config/erbantou/bootstrap.yml -jar erbantou-cloud.jar
ExecReload=/bin/kill -s HUP $MAINPID
ExecStop=/bin/kill -s QUIT $MAINPID
PrivateTmp=true
Restart=always
RestartSec=5
StartLimitInterval=0

[Install]
WantedBy=multi-user.target
瘦身包转普通包(不推荐)
java -jar erbantou-cloud.jar -Dthin.dryrun -Dthin.root=target/thin/root
java -jar erbantou-cloud.jar -Dthin.library=org.springframework.boot.experimental:spring-boot-thin-tools-converter:1.0.28.RELEASE
java -jar erbantou-cloud-exec.jar


评论区